Update: 2026-04-13
ClangSynth is a synthesizer suitable for percussion sounds. Each voice equips an 8 * 8 feedback delay network (FDN) as a resonator. Oscillator is static wavetalble with controls specialized to make pulse train.
full - VST 3 (github.com) macOS - VST 3 (github.com) ClangCymbal is a spin off of ClangSynth. FDN size is expended to 64 * 64 to provide more rich harmonics. However it is monophonic due to increased CPU load. Oscillator is changed for noise/pulse mix which is more suitable to make cymbal sounds. It can also make sound of manhole dragged on asphalt.
full - VST 3 (github.com) macOS - VST 3 (github.com) full package contains following builds.
Linux build is built on Ubuntu 24.04. If you are using distribution other than Ubuntu 24.04, plugin will not likely to run. In this case, please take a look at build instruction.
macOS package is recommended for macOS user. I can’t
purchase Apple Developer Program, therefore installation requires a
workaround to bypass Gatekeeper. Details of workaround are written in
Installation -> macOS Specific
section.
Feel free to contact me on GitHub
repository or ryukau@gmail.com.
You can fund the development through paypal.me/ryukau.
Move *.vst3 directory to:
/Program Files/Common Files/VST3/ for Windows.$HOME/.vst3/ for Linux./Users/$USERNAME/Library/Audio/Plug-ins/VST3/ for
macOS.DAW may provides additional VST3 directory. For more information, please refer to the manual of the DAW.
Notice: Some plugins don’t have presets provided by Uhhyou Plugins.
Presets are included in the plugin package linked at the top of this page. To install presets, follow the steps below.
presets directory placed in extracted
package.Uhhyou directory into an OS specific preset
directory (see below).Below is a list of preset directories for each OS.
/Users/$USERNAME/Documents/VST3 Presets$HOME/.vst3/presets/Users/$USERNAME/Library/Audio/PresetsPreset directory name must be the same as the plugin. If preset directory does not exist, create it.
If DAW doesn’t recognize the plugin, try installing C++
redistributable (vc_redist.x64.exe). Installer can be
found in the link below.
On Ubuntu 24.04, those packages are required.
sudo apt install libxcb-cursor0 libxkbcommon-x11-0If DAW doesn’t recognize the plugin, take a look at
Package Requirements section of the link below and make
sure all the VST3 related package is installed.
REAPER on Linux may not recognize the plugin. A workaround is to
delete a file ~/.config/REAPER/reaper-vstplugins64.ini
and restart REAPER.
Important: full package is not
confirmed working. When using full, try removing
following files.
Contents/Resources/DocumentationContents/x86_64-linuxContents/x86_64-winmacOS package doesn’t contain above files. Also, all
packages are in “ad-hoc signing” state set by codesign
command.
When trying to run plugin first time, following message may appear on macOS.
<PluginName>.vst3 is damaged and can't be opened. You should move it to the Trash.In this case, open terminal and try running one or both of
following command to unzipped .vst3 directory. Replace
/path/to/PluginName.vst3 according to your install
location.
xattr -rd com.apple.quarantine /path/to/PluginName.vst3
xattr -rc /path/to/PluginName.vst3Plugin may be considered as unsigned/un-notarized application. In this case, open System Preferences, go to Security & Privacy → General, then click the Open Anyway button. The offcial Apple help page linked below has screenshots for the procedure. See “If you want to open an app that hasn’t been notarized or is from an unidentified developer” section.
If the plugin is still not working, try changing install location
to /Library/Audio/Plug-ins/VST3/ or
/Users/$USERNAME/Library/Audio/Plug-ins/VST3/ whichever
still haven’t tried.
If all the above methods do not work, try following the steps below.
sudo spctl --master-disable.Beware that steps above degrades security of your system. To revert the settings, follow the steps below.
sudo spctl --master-enable.codesignNote This section may not relevant to
macOS packages. However it’s not verified. (GitHub
issue)
To use full package, following command might be
used.
sudo codesign --force --deep -s - /path/to/PluginName.vst3codesign might not be available without installing Xcode.
At first time, create color config file to:
/Users/USERNAME/AppData/Roaming/UhhyouPlugins/style/style.json
on Windows.$XDG_CONFIG_HOME/UhhyouPlugins/style/style.json on
Linux.
$XDG_CONFIG_HOME is empty, make
$HOME/.config/UhhyouPlugins/style/style.json./Users/$USERNAME/Library/Preferences/UhhyouPlugins/style/style.json
on macOS.style.json will be loaded for each time a plugin
window opens.
Several color themes are available on the link below. To use, copy
the text to style.json.
Below is an example of style.json.
{
  "guiScale"          : 1          ,
  "fontFamily"        : "Tinos"    ,
  "fontBold"          : true       ,
  "fontItalic"        : true       ,
  "foreground"        : "#000000"  ,
  "foregroundButtonOn": "#000000"  ,
  "foregroundInactive": "#8a8a8a"  ,
  "background"        : "#ffffff"  ,
  "boxBackground"     : "#ffffff"  ,
  "border"            : "#000000"  ,
  "borderCheckbox"    : "#000000"  ,
  "borderLabel"       : "#000000"  ,
  "unfocused"         : "#dddddd"  ,
  "highlightMain"     : "#0ba4f1"  ,
  "highlightAccent"   : "#13c136"  ,
  "highlightButton"   : "#fcc04f"  ,
  "highlightWarning"  : "#fc8080"  ,
  "overlay"           : "#00000088",
  "overlayHighlight"  : "#00ff0033"
}guiScale: GUI scaling. For example, 0.75
is 75%, and 2.0 is 200%.The minimum of guiScale is 0.01. The
maximum is practically non-existent (the max value of 64-bit
float).
Notice: If guiScale is too large, DAW
may place the “close” button on the plugin window out of screen,
making it unclickable.
Following is a list of font options.
fontFamily: Font family name.fontBold: Enable bold style when
true, disable when false.fontItalic: Enable italic style when
true, disable when false.System font can be used as fontFamily. To use
different fonts for different plugins, place *.ttf file
into custom font path:
*.vst3/Contents/Resources/Fonts.
Notice: If the combination of
fontFamily, fontBold,
fontItalic does not exist in custom font path, default
font of VSTGUI is used.
If fontFamily is set to empty string "",
then "Tinos"
is used as fallback. If the length is greater than 1 and the font
family name doesn’t exist, default font of VSTGUI is used.
Styles other than bold, italic or bold-italic are not supported by VSTGUI. For example, “Thin”, “Light”, “Medium”, and “Black” weights cannot be used.
Hex color codes are used.
First letter # is conventional. Plugins ignore the
first letter of color code, thus ?102938,
\n11335577 are valid.
Do not use characters outside of 0-9a-f for color
value.
Following is a list of color options. If an option is missing, default color will be used.
foreground: Text color.foregroundButtonOn: Text color of active toggle
button. Recommend to use the same value of foreground or
boxBackground.foregroundInactive: Text color of inactive
components. Currently, only used for TabView.background: Background color.boxBackground: Background color of inside of box
shaped components (Barbox, Button, Checkbox, OptionMenu, TextKnob,
VSlider).border: Border color of box shaped components.borderCheckbox: Border color of CheckBox.borderLabel: Line color of parameter section
label.unfocused: Color to fill unfocused components.
Currently, only used for knobs.highlightMain: Color to indicate focus is on a
component. Highlight colors are also used for value of slider
components (BarBox and VSlider).highlightAccent: Same as highlightMain.
Used for cosmetics.highlightButton: Color to indicate focus is on a
button.highlightWarning: Same as highlightMain,
but only used for parameters which requires extra caution.overlay: Overlay color. Used to overlay texts and
indicators.overlayHighlight: Overlay color to highlight current
focus.Right Click on the controls pops up a context menu provided by DAW.
Knob and slider provides following controls:
dB) parameters,
floor is applied after the value is converted to amplitude.Control with many blue vertical bars (BarBox) have some keyboard shortcuts. Shortcuts are enabled after left clicking BarBox and mouse cursor is on the inside of BarBox.
| Input | Control |
|---|---|
| Left Drag | Change Value |
| Shift + Left Drag | Change Value (Snapped) |
| Ctrl + Left Drag | Reset to Default |
| Ctrl + Shift + Left Drag | Change Value (Skip Between Frames) |
| Middle Drag | Draw Line |
| Shift + Middle Drag | Edit One Bar |
| Ctrl + Middle Drag | Reset to Default |
| Ctrl + Shift + Middle Drag | Toggle Lock |
| a | Alternate Sign |
| d | Reset Everything to Default |
| D | Toggle Min/Mid/Max |
| e | Emphasize Low |
| E | Emphasize High |
| f | Low-pass Filter |
| F | High-pass Filter |
| i | Invert Value (Preserve minimum) |
| I | Invert Value (Minimum to 0) |
| l | Toggle Lock under Mouse Cursor |
| L | Toggle Lock for All |
| n | Normalize (Preserve minimum) |
| N | Normalize (Minimum to 0) |
| p | Permute |
| r | Randomize |
| R | Sparse Randomize |
| s | Sort Descending Order |
| S | Sort Ascending Order |
| t | Subtle Randomize (Random walk) |
| T | Subtle Randomize (Converge to 0) |
| z | Undo |
| Z | Redo |
| , (Comma) | Rotate Back |
| . (Period) | Rotate Forward |
| 1 | Decrease |
| 2-4 | Decrease 2n-4n |
| 5-9 | Decimate by holding 2n-5n |
Snapping is not available for all BarBox. If you’d like to have snapping for certain BarBox, feel free to open issue to GitHub repository.
Edit One Bar with Shift + Right Drag holds a bar under the cursor when mouse right button is pressed. Then only changes that one bar while holding down mouse right button.
Toggle Lock with Ctrl + Shift + Right Drag behaves as line edit. When right mouse button (RMB) is pressed, it holds the opposite state of the bar below mouse cursor, then use the state for the rest of bars. For example, if RMB is pressed on a locked bar, dragging unlocks bars while holding down RMB.
Some BarBox has scroll bar to zoom in. Scroll bar has handles on left end and right end. To control zoom, use Left Drag on one of the handle. Scroll bar also has following controls:
Output amplitude varies greatly. Recommend to insert limiter after ClangSynth.
FDN may blow up if some parameters change too fast. Use LFO and envelope with caution. When parameter is changed while playing, it breaks the assumption of linear time-invariant (LTI) system which FDN relies on. Following is a list of parameter which potentially blow up FDN.
Amount > FDN Pitch> LP Cut> HP Cut> FDN Pitch> FDN OT +Refresh Wavetable button refreshes wavetable. Beware
that while refreshing, CPU load becomes high and it will most likely
stop the DAW output for a moment.
If the image is small, use Ctrl + Mouse Wheel or “View Image” on right click menu to scale.
Diagram only shows overview. It’s not exact implementation.


Characters inside of square brackets [] represents unit. Following is a list of units used in ClangSynth.
Output gain.
Output gain smoothing time. Increasing Attack also
increases release time.
Note that the value is not exact. It converts to filter cutoff frequency.
Attack is introduced to prevent pop noise at note-on,
when Reset to Note On is not checked. When lowpass cutoff
in FDN is lowered, reducing Attack may cause pop noise.
If the sound is dense at high frequency, like cymbal, it may be
possible to set Attack to 0, because pop noise is
unnoticeable.
Release time after note-off.
Note that the value is not exact. It converts to filter cutoff frequency.
Changes master pitch.
Milli is 1/1000 of semitone or 1/10 cent.
Changes tuning.
ET stands for equal temperament. Note that when
ET is less than 12, some notes becomes silent due to
frequency becomes too high or too low.
A4 [Hz] is frequency of note A4.
Pitch bend range. Unit is semitone.
Number of voices a unison uses.
Amount of pan width in a unison.
At first note-on, pan is allocated from right to left. Rightmost has lowest pitch, and leftmost has highest. After that, the allocation rotates to left for each note-on.
Multiplier to unison pitch.
When the value of Pitch * is 0, Interval
do nothing.
Equal temperament fineness specific for Interval.
Interval is the amount of offset to the note
pitch.
Cycle At is modulo of Interval index.
For example, considier the following values are set to
Interval.
1, 2, 3, 4The value of Pitch * multiplies each
Interval. Now we consider the value of
Pitch * is set to 0.1. The values change to the
following.
0.1, 0.2, 0.3, 0.4The above values turns into a sequence. The sequence starts from
index 0, and increases 1 for each voice. When index reaches the value
set at Cycle At, it goes back to 0. Now, we set
Cycle At to 1.
0.1, 0.2, 0.1, 0.2, ...Then we send note number 60 to the synthesizer. The pitch for each voice becomes following.
60,                         // 60
60 + 0.1,                   // 60.1
60 + 0.1 + 0.2,             // 60.3
60 + 0.1 + 0.2 + 0.1,       // 60.4
60 + 0.1 + 0.2 + 0.1 + 0.2, // 60.6
...
Below is a code of above procedure.
modulo = cycleAt + 1;
accumulator = 0;
for index in [0, nUnison) {
  voice[index].pitch = notePitch + pitchMultiplier * accumulator;
  accumulator += interval[index % modulo];
}Maximum number of voices to play at the same time.
Decresing nVoice reduces the CPU load.
Parameter smoothing time.
Note that the value is not exact. It converts to filter cutoff frequency.
Gain of impulse which is triggered at note-on.
Impulse can be used as a spice for cymbal sound. Also, impulse is not affected by velocity, so it can be used to control intensity of impact to cymbal independent to wavetable oscillator.
TODO プリセットの紹介
Oscillator output gain.
Oscillator AD envelope attack time and decay time.
When Decay is short, increasing Attack
almost doesn’t change the sound.
Note that the value is not exact. It converts to filter cutoff frequency.
Oscillator pitch tuning in octave or semitone.
Parameters to generate source spectrum for wavetable.
Denom. Slope : Slope of denominator of frequency
amplitude.Rot. Slope : Slope of phase rotation.Rot. Offset : Offset of phase rotation.Interval : Frequency index interval to write a
value.When Denom. Slope is greater than 1, it acts like
lowpass filter. At less than 1, it acts like highpass filter. At
exactly 1, it generates amplitude of sawtooth wave spectrum.
Interval creates 0 in specrum. For example, when
Interval is 3, amplitude of index 1, 4, 7, 10, 13, …
becomes non 0, and amplitude of other indices becomes 0. When
Denom. Slope is 1 and Interval is 2,
resulting waveform becomes square wave.
Following is source spectrum generation procedure.
for index in [1, numberOfHarmonics] {
    if (index % interval != 0) continue;
    sourceSpectrum[index].amp = 1 / (denominatorSlope * index);
    sourceSpectrum[index].phase = rotationOffset + rotationSlope * index;
}Frequency index of highpass filter which applies to source spectrum amplitude.
Amplitude of frequency, which index is below the
Harmonic HP, will be reduced. When
Harmonic HP is 0, highpass filter is bypassed.
Following shows the computation of Harmonic HP.
for index in [0, harmonicHighpass) {
  sourceSpectrum[index].amp *= index / harmonicHighpass;
}Coefficient of lowpass filter which applies to source spectrum amplitude.
Reducing Blur diffuses frequency amplitude to adjacent
indices. It means that the resulting sound becomes close to impulse
when ignoring phase rotations.
When Blur is 1, lowpass filter is bypassed.
TODO 図
Amplitude and phase rotation to add source spectrum as overtone.
OT Amp. : Overtone amplitude.Rot. \[rad/pi\] : Overtone phase rotation.Following shows the procedure to make final spectrum using
OT Amp. and Rot.
targetSpectrum.fill(0);

for i in [0, nOvertone) {
  for k in [0, nFrequency) {
    auto index = (i + 1) * k;
    if (index >= nFrequency) break;
    targetSpectrum[index] += sourceSpectrum[k] * complexFromPolar(otAmp[i], otRot[i]);
  }
}When the button is pressed, wavetable starts refreshing.
Beware that refreshing increases CPU load, and it will likely stop the sound for a moment.
Following parameters are only applied after
Refresh Wavetable is pressed.
Denom. SlopeRot. SlopeRot. OffsetIntervalHarmonic HPBlurOT Amp.Rot. [rad/pi]When lit, oscillator output goes through FDN.
It is useful to bypass FDN when checking the raw oscillator output.
Cross feedback amount between delays.
When Identitiy is 0, feedback matrix becomes identity
matrix. This means that it behaves as a bunch of comb filters.
Increasing Identity means to increase cross feedback
amount between delays. More cross feedback adds more non-integer
harmonics, which sounds more metallic.
Feedback amount of the entire FDN.
Even if the Feedback is set ot 1, output decays due to
the linear interpolation used inside of delay.
Rate limiting amount to the change of delay time.
Inverse of cutoff frequency of lowpass filter, which is used to interpolate delay time.
On delay time interpolation, the value first goes into lowpass filter, then rate limiter.
Seed value of psuedo-random number generator (PRNG) used for matrix randomization.
Ratio of feedback matrix randomization for each note-on.
Internally, ClangSynth is holding two pairs of matrix randomization
seed values. One of the pair is fixed when DAW starts playing. Another
is generated at each note-on. Randomize is the ratio to
mix those 2 pairs.
When Randomize is 0, harmonics of FDN only depends on
Seed value, and it doesn’t changed by note-on. When
Randomize is 1, each note-on changes the harmonics of
FDN.
This group of parameters changes delay times as overtone of note pitch.
OT + : Incrementation to previous harmonic
value.OT * : Multiplier to previous harmonic value.OT Offset : Amount of harmonic shift.OT Modulo : Modulo of the harmonic value calculated
from OT + and OT *.OT Random : Harmonics randomization amount for each
note-on.Setting OT + and OT Offset as non-integer
value makes the resulting sound close to some percussion.
OT * and OT Modulo creates unnatural
harmonics.
Followins is the procedure to determine delay times.
// At note on.
for idnex in [0, fdnMatrixSize) {
    overtoneRandomness[idx] = randomUniform(-1, 1) * otRandom;
}

// For each sample.
overtone = 1;
for idnex in [0, fdnMatrixSize) {
  ot = otOffset + (1 + overtoneRandomness[index]) * overtone;
  fdn.delayTime[index] = sampleRate / (ot * noteFrequency);
  overtone = overtone * otMul + otAdd;
  overtone = fmod(overtone, 1 + otModulo);
}When checked, each note-on resets FDN internal state.
Beware the CPU load spike caused by reset. If the sound stops at
note-on, decreasing nVoice might help to reduce CPU
load.
Cutoff frequency of lowpass or highpass filter.
Q factor of lowpass or highpass filter.
When checked, cutoff frequency changes by following the pitch of a note.
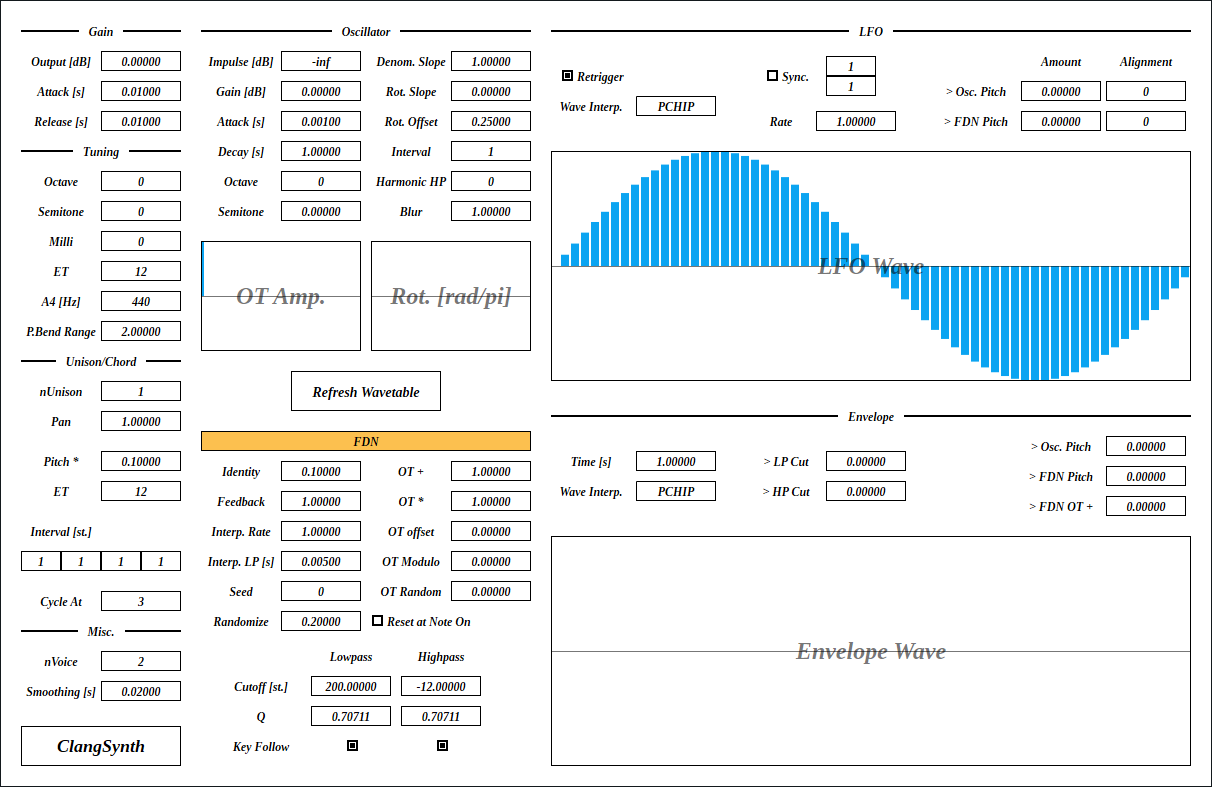
The waveform of LFO wavetable.
Wavetable is shared between all voices.
When Retrigger is checked, note-on resets LFO
phase.
When Retrigger is not checked, all the voices uses
same LFO phase.
If 1 voice represents 1 object, check Retrigger. If
note-on represents impact to the same object again and again, do not
check Retrigger.
LFO wave form interpolation method.
Step: Holding.Linear: Linear interpolation.PCHIP: Monotonic cubic interpolation.Step makes LFO to act like a sequencer.
Linear sounds similar to PCHIP, and the
computation cost is lower. PCHIP is the most smooth among
all 3.
When checked, it enables tempo synchronization (tempo sync). LFO phase also synchronize to the exact position derived from sync interval, and time passed from the start of playback.
When not checked, LFO behaves as same as if synchronizing to 120 BPM. It also disables LFO phase sync.
Numerator of sync interval.
LFO synchronizes to 1 bar when
(Tempo Upper) / (Tempo Lower) is 1/1.
1/4 synchronizes to 1 beat when time signature of
4/4. Note that Rate multiplies the sync
interval.
Following is the equation to calculate sync interval.
syncInterval = (Rate) * (Tempo Upper) / (Tempo Lower);Denominator of sync interval.
Note that Rate multiplies the sync interval.
Multiplier to sync interval.
Rate is convenient when changing sync interval while
keeping the values of Tempo Upper and
Tempo Lower.
Modulation amount to oscillator or FDN pitch. Unit is semitone.
> Osc. Pitch row modulates oscillator, and
> FDN Pitch row modulates FDN.
Modulation amount from LFO to pitch only uses the multiple of
Alignment. For example, if current Amount is
12.345 and Alignment is 6, actual modulation amount
becomes 12.
When Alignment is 0, the value of Amount
is used directly without alignment.
Following is procedure of LFO to pitch modulation.
if (alignment == 0)
  modulation = amount * lfo;
else
modulation = alignment * floor(lfo * amount / alignment + 0.5);The waveform of envelope wavetable.
Wavetable is shared between all voices.
Duration of envelope from the start of a note.
When envelope reaches the end, all the modulation amounts becomes 0.
Envelope wave form interpolation method.
This parameter works as same as Wave Interp. in LFO.
Refer to the Wave Interp. in LFO section for details.
Modulation amount to cutoff frequency of FDN lowpass filters. Unit is semitone.
Modulation amount to cutoff frequency of FDN highpass filters. Unit is semitone.
Modulation amount to oscillator pitch. Unit is semitone.
Modulation amount to FDN pitch. Unit is semitone.
Modulation amount to OT + in FDN section.
> FDN OT + changes pitch using overtone structure,
while > FDN Pitch moves entire pitch.
This section only lists the parameters different to ClangSynth.
Intention of tremolo is to crudely imitate the distance from vibrating object to microphone. Modulation signal is sine wave.
Mixing ratio of input and delay output.
When the value is 0.0, input is bypassed.
Modulation amount to the gain of delay output.
Maximum delay time.
Amount of DC offset which adds to the delay time modulation signal.
On top of Misc.->Smoothing, extra smoothing is
applied to Delay Offset.
Frequency of modulation sine wave.
Pitch slide options are the difference to ClangSynth.
Pitch slide time.
3 types of pitch slide are available.
Always : Always slide from the pitch of last
note.Sustain : Only slide when 2 or more keys are
pressed.Reset to 0 : When number of pressed key is changed
from 0 to 1, or 1 to 0, pitch will be slide to 0 Hz. Otherwise, slide
behaves same as other 2 options. On release, slide time follows the
value of Gain->Release, instead of
Misc.->Slide.When checked, it enables 2-fold oversampling.
Recommend to turn on for better metallic texture. However it doubles the CPU load.
When turned off, it reduces CPU load. However it also degrades metallic texture because of the high frequency loss caused by linear interpolation used in delays inside of FDN. It might be better to use external equalizer to compensate the high frequency loss.
ClangCymbal uses mix of noise and pulse train as an oscillator.
Noise generation step is following:
Integrator here is not the exact one used in theory, but behaves similarly.
Pulse train is generated by BLIT (band-limited impulse train) algorithm. The naive pulse train used in noise generation is not related to this one.
Mixing ratio of noise and pulse train.
Lowpass filter cutoff frequency.
Lowpass filter Q.
Key follow amount to LP Cutoff.
When LP Cutoff is set to 0, Q is set to
maximum, and LP Key is set to 1, the oscillator outputs
sine wave.
Density of noise and pulse train.
To match the tuning to FDN, set the value of Density
to the same value of Tuning->A4, then set
Density key to 1.
Key follow amount to Density.
Decay time of a noise burst.
When the value of Noise Decay is small, it sounds like
pulse train. However, the naive pulse train used for noise generator
is not anti-aliased. Therefore it has different texture to BLIT.
Amount of bouncing effect.
The bouncing effect is tied to AD envelope output, and bouncing
interval becomes shorter when AD envelope amplitude becomes lower. The
effect is disabled when Bounce is 0.0.
Bounce can be used to simulate the bounce of a stick
on a surface.
The curve parameter of Bounce effect.
Increasing Bounce Curve shorten the interval of
bounce.
Randomness of pulse interval.
Randomness of the amplitude of a naive pulse on noise generator.
Individual control for each filter is added compared to ClangSynth. This increases flexibility, and CPU load.
Amount of increment or decrement to the filter cutoff. The amount is proportional to the order of harmonics.
Amount of increment or decrement to the filter Q. The amount is proportional to the order of harmonics.
The value added to filter cutoff frequency, which is calculated
from Cutoff and Cutoff Slope.
On the control, the order of harmonics becomes lower towards left, and higher towards right. Note that higher harmonics may affects lower frequency, and lower harmonics may affects higher frequency. This is due to the cross feedback on FDN.
The value added to filter Q, which is calculated from
Q and Q Slope.
As same as Cut Offset, left side of control represents
lower harmonics and right side represents higher harmonics.
Modulation amount to Oscillator->Jitter.
Modulation amount to Oscillator->Noise/Pulse.
style.json crashes
plugin.foregroundInactive.processContext is
nullptr.virtual to destructor of common components.
This may prevent some cause of crash or memory leak.style.json crashes
plugin.foregroundInactive.processContext is
nullptr.virtual to destructor of common components.
This may prevent some cause of crash or memory leak.Seed is
changed. With this change, the same sound comes out when
Seed is changed and when full reset is done.kNotInitialized was incorrectly returned when sampling
rate is changed.ClangSynth is licensed under GPLv3. Complete licenses are linked below.
If the link above doesn’t work, please send email to
ryukau@gmail.com.
VST is a trademark of Steinberg Media Technologies GmbH, registered in Europe and other countries.